Solana Free in Devnet
What is Solana? Basics and concepts
Solana is one of the blockchains. That means you can buy and sell crypto coins there. You can create your own based on rust programming language. Let's see
Devnet
Create a token (coin, nfts, etc) costs money, but we have to test our token before we deploy it. So, to do this, we will be working on devnet, that works like a testnet and it allows us to develop without loss money
Mainnet
It is solana production enviorment, that means it works with real money, real transactions and real blockchain.
Development
Both, devnet and mainet have the same process to code, there is one minor exception. We will see it later.
🪙 Token Creation
Install docker
First, We have to install docker in our system. This because we will be using docker to create a ISO Image of Debian 12 Bookworm, where our Solana token will be running.
We are going to look for libraries that could generate conflicts:
for pkg in docker.io docker-doc docker-compose podman-docker containerd runc; do sudo apt-get remove $pkg; done
Prepare a .sh file with nano, for example nano docker-install.sh:
# Add Docker's official GPG key:
sudo apt-get update
sudo apt-get install ca-certificates curl
sudo install -m 0755 -d /etc/apt/keyrings
sudo curl -fsSL https://download.docker.com/linux/debian/gpg -o /etc/apt/keyrings/docker.asc
sudo chmod a+r /etc/apt/keyrings/docker.asc

# Add the repository to Apt sources:
echo \
  "deb [arch=$(dpkg --print-architecture) signed-by=/etc/apt/keyrings/docker.asc] https://download.docker.com/linux/debian \
  $(. /etc/os-release && echo "$VERSION_CODENAME") stable" | \
  sudo tee /etc/apt/sources.list.d/docker.list > /dev/null
sudo apt-get update
And we will give it writing permission
chmod +x ./docker-install.sh
./docker-install.sh
Then, we can install docker packages:
sudo apt-get install docker-ce docker-ce-cli containerd.io docker-buildx-plugin docker-compose-plugin
To prove you have docker installed and running correctly run the command below:
sudo systemctl status docker
If it appears disabled or it is not running, you can activate using
sudo systemctl start docker
Create token development environment
Once we have docker, we are going to create our development environnment:
mkdir solana-token
cd solana-token
After this, we need to create a Dockerfile with this exact name
nano Dockerfile
Inside this, this code must be there:
# Use a lightweight base image
FROM debian:bookworm

# Set non-interactive frontend for apt
ENV DEBIAN_FRONTEND=noninteractive

# Install required dependencies and Rust
RUN apt-get update && apt-get install -y \
    curl build-essential libssl-dev pkg-config nano \
    && curl --proto '=https' --tlsv1.2 -sSf https://sh.rustup.rs | sh -s -- -y \
    && apt-get clean && rm -rf /var/lib/apt/lists/*

# Add Rust to PATH
ENV PATH="/root/.cargo/bin:$PATH"

# Verify Rust installation
RUN rustc --version

# Install Solana CLI
RUN curl -sSfL https://release.anza.xyz/stable/install | sh \
    && echo 'export PATH="$HOME/.local/share/solana/install/active_release/bin:$PATH"' >> ~/.bashrc

# Add Solana CLI to PATH
ENV PATH="/root/.local/share/solana/install/active_release/bin:$PATH"

# Verify Solana CLI installation
RUN solana --version

# Set up Solana config for Devnet
RUN solana config set -ud

# Set working directory
WORKDIR /solana-token

# Default command to run a shell
CMD ["/bin/bash"]
Finally, we will create the docker image that we created and then, we will run it:
docker build -t testsolana .
docker run -it --rm -v $(pwd):/solana-token -v $(pwd)/solana-data:/root/.config/solana testsolana
Configure token
Create an account for mint authority
- This type of account will own the token we are creating
- It works like a wallet
- dad is the term that we are using to this wallet/account, is The boss of our new token
solana-keygen grind --starts-with dad:1
Set account as default keypair
This is saying to Solana CLI that this will be the main or default account
solana config set --keypair dad-your-token-acount.json
To see dad-your-token-acount.json write in your terminal ls and you will be able to see the file that starts with letters dad....
Change to devnet
At this point, you will choose in which net you are going to work. In this note, the first part is explaining in devnet, it is a test net. Later, you will be able to see how to do this but in mainet
To change to devnet:
solana config set --url devnet
Now, to know what is our current configuration:
solana config get
Getting some SOL...
- In devnet as mainet, you have to send SOL to create your token. In mainet, you should buy with real money some of SOL, but in devnet, you just have to go https://faucet.solana.com/.
Faucet is a crypto platform where users can get a little bit of cripto related with its blockchain, so you can find faucet of Bitcoin, Ethereum or, as in this case, Solana
- To get some SOL, we need to know what is our address. With this command you can get it:
solana address
- This command will show you the address what you have to set here:
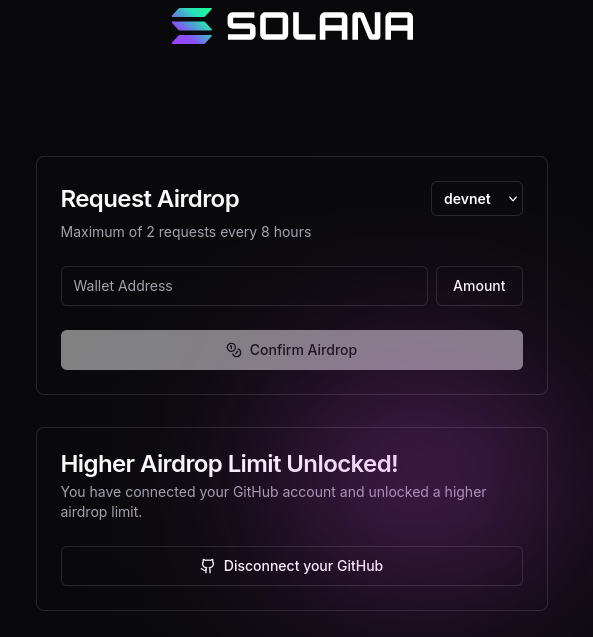
Once you click on Confirm Airdrop, you will se this message:
Now, we have to confirm the amount has been set in our wallet:
solana balance
Mint address creation
What is this?
A mint address works like a token factory ! So it means that with this address/wallet you will be able to create tokens
To generate that
solana-keygen grind --starts-with mnt:1
Let's mint
After generate our mint address, we will be able to create our first token:
Program-id: It is the default token program from solana
spl-token create-token \
--program-id TokenzQdBNbLqP5VEhdkAS6EPFLC1PHnBqCXEpPxuEb \
--enable-metadata \
--decimals 9 \
mnt-your-mint-address.json
mnt-your-mint-address.jsonis the file generated at the begining of #Mint address creation. Write in consolelsand pressenterto se files. You will see a file starting with lettersmnt.
Submit Metadata
Pinata: https://app.pinata.cloud/. This is a platform to submit your files in a descentralized storage. Here, we are going to submit your token image file, and your token metadata.
Once you created your account, we can pass to next step
Create metadata file
nano testtoken.json
Inside this we will put this:
{
  "name": "Your Coin Name",
  "symbol": "YOURSYMBOL",
  "description": "Description",
  "image": "https://url-to-your-image.jpg"
}
Ensure that each field is replaced with your preference data and image file must have the next features:
- Either 512x512 and 1024x1024: Square form
- less than 100kb
Submit metadata to pinata
Now, you have to submit this file to pinata and copy the uri. Then, you will be able to update the token and to see it reflected in solana explorer (in devnet).
spl-token initialize-metadata \
mnteyhFCjqLu5QwfXmEu49dGybyFN5dwPfAhoiMbjNw \
"Your Coin Name" \
"YOURSYMBOL" \
https://link-to-your-metadata-in-pinata
Make some tokens
Now, after all these steps, you can create tokens:
You have to consider that mnteyhFCjqLu5QwfXmEu49dGybyFN5dwPfAhoiMbjNw in this example is the same value that you can see in mnt-your-mint-address.json, but without the end: .json
- First, we have to create a new account, in charge of hold tokens (initial tokens deploy)
spl-token create-account mnteyhFCjqLu5QwfXmEu49dGybyFN5dwPfAhoiMbjNw
- Then, you will be able to add tokens with this command, you can add any amount that you want. For this example, will be
1000, as you can see below:
spl-token mint mnteyhFCjqLu5QwfXmEu49dGybyFN5dwPfAhoiMbjNw 1000
- Now you can check it in terminal:
spl-token balance mnteyhFCjqLu5QwfXmEu49dGybyFN5dwPfAhoiMbjNw
Transfer Tokens to another account
To this step, you have to be sure that you have activated testnet in Solana Wallet
In your prefered wallet, create a new account and transfer tokens from your mnt address:
spl-token transfer mnteyhFCjqLu5QwfXmEu49dGybyFN5dwPfAhoiMbjNw 10 G5EibadVBKxnshP3NSFagJokfxXCD2VPm6WXoqgDSdQ2 --fund-recipient --allow-unfunded-recipient
Params:
--fund-recipient: this will try to find a recipient--allow-unfunded-recipient: This will allow to unfunded recipients get funds